Radar Core
Direct Level II Product Rendering
Run REF, VEL, RHO, ZDR, PHI, and SW from native radar volumes. Multi-source fallback between IEM Mesonet and Unidata S3 with automatic staleness detection.
StormDeck delivers low-latency Level II radar, split-pane product comparison, light/dark themes, and an integrated AI agent that can use live weather tools during severe operations.
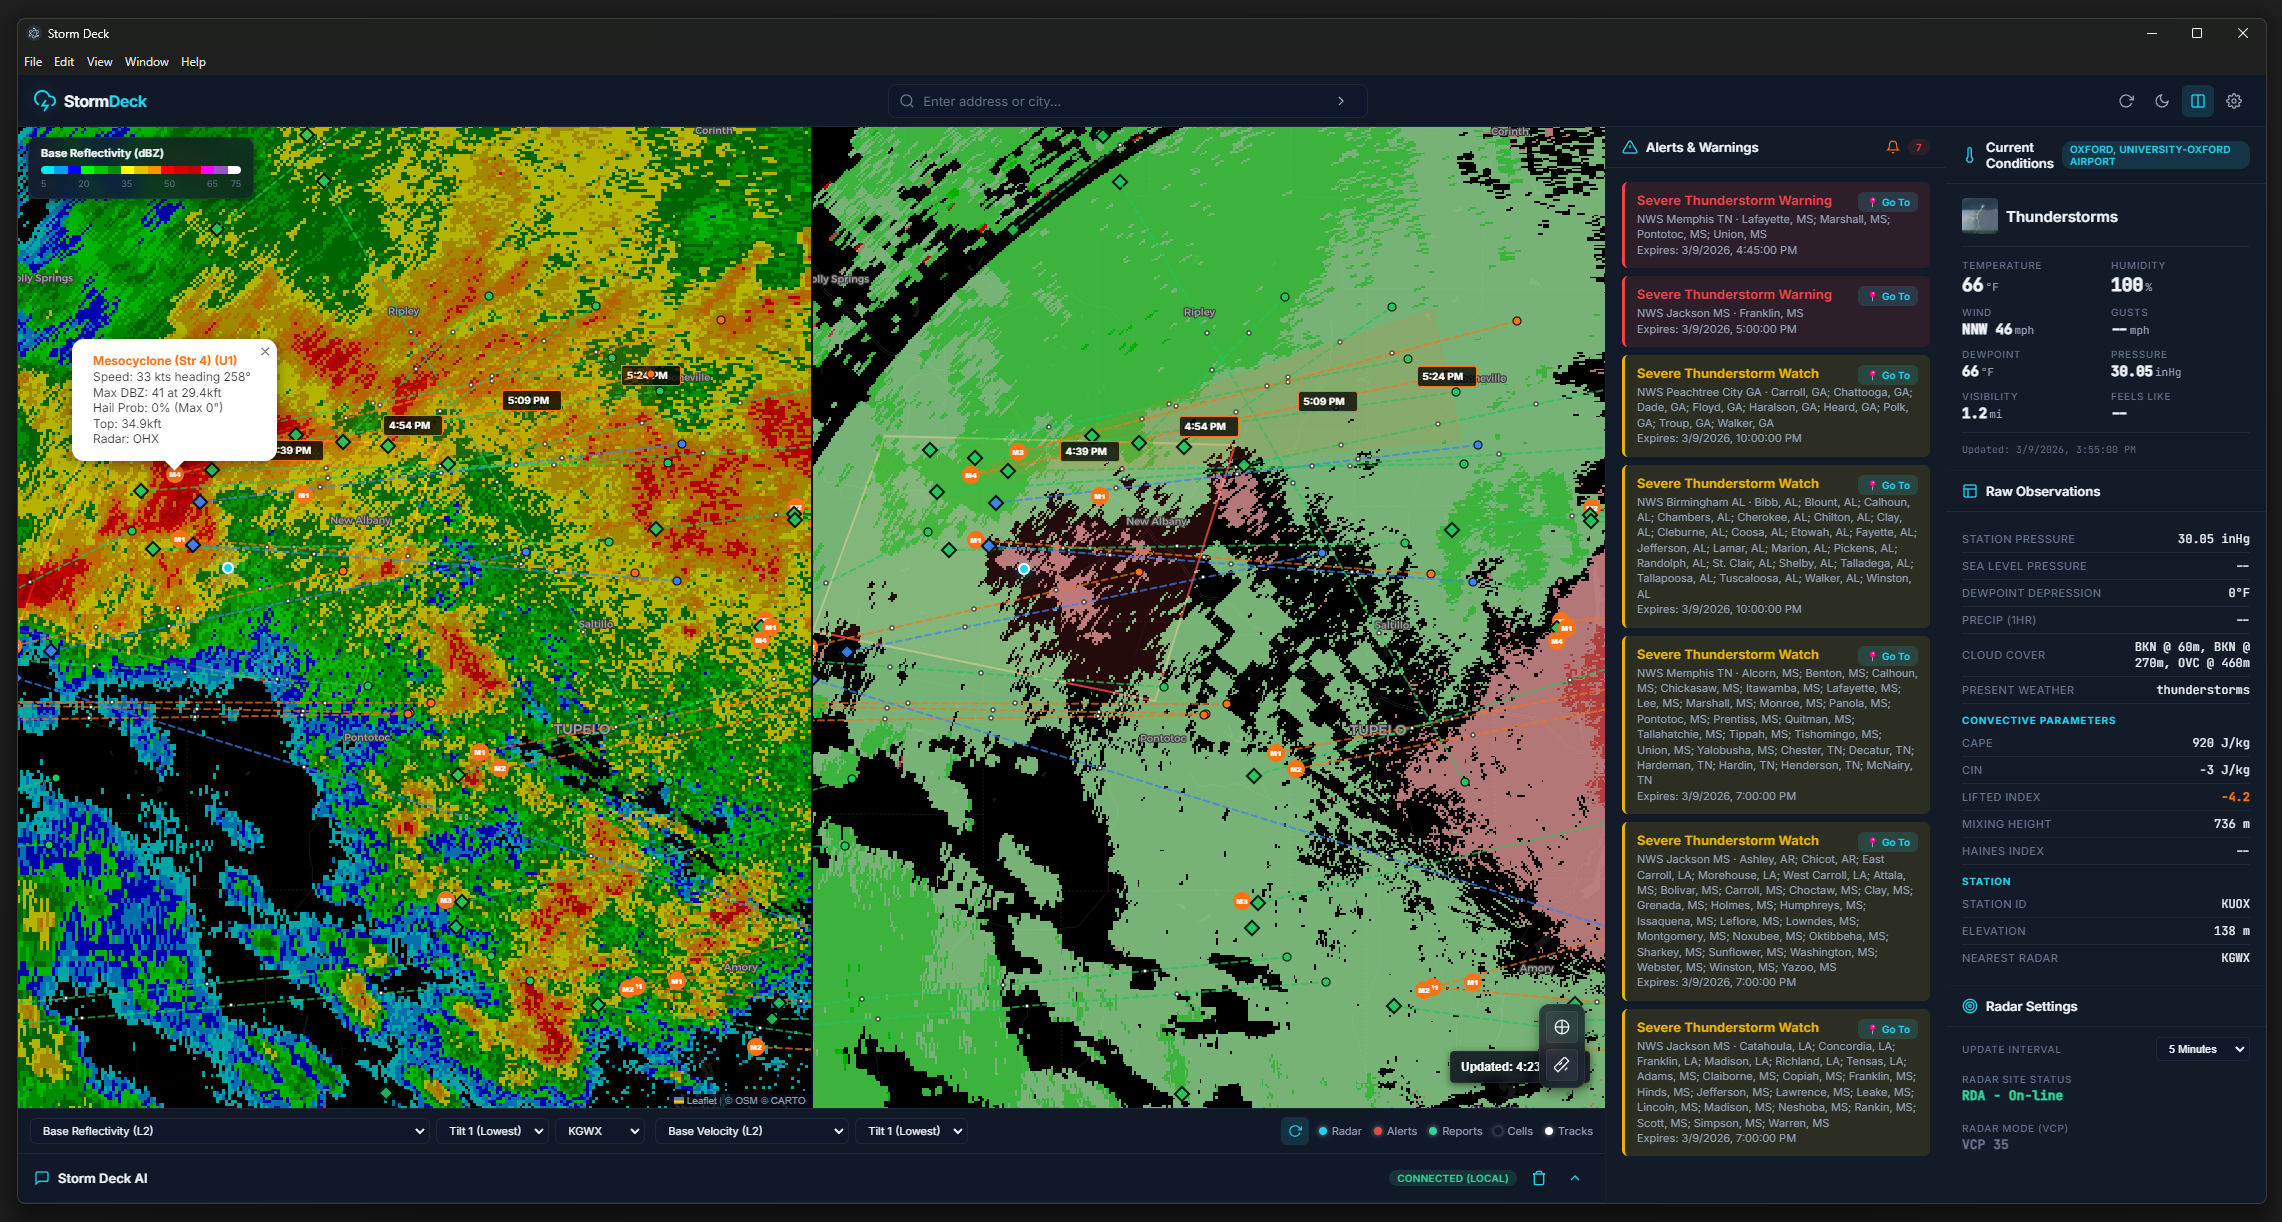
The interface mirrors the in-app visual language with both dark and light themes, built to keep attention on active weather threats while preserving readability.
Run REF, VEL, RHO, ZDR, PHI, and SW from native radar volumes. Multi-source fallback between IEM Mesonet and Unidata S3 with automatic staleness detection.
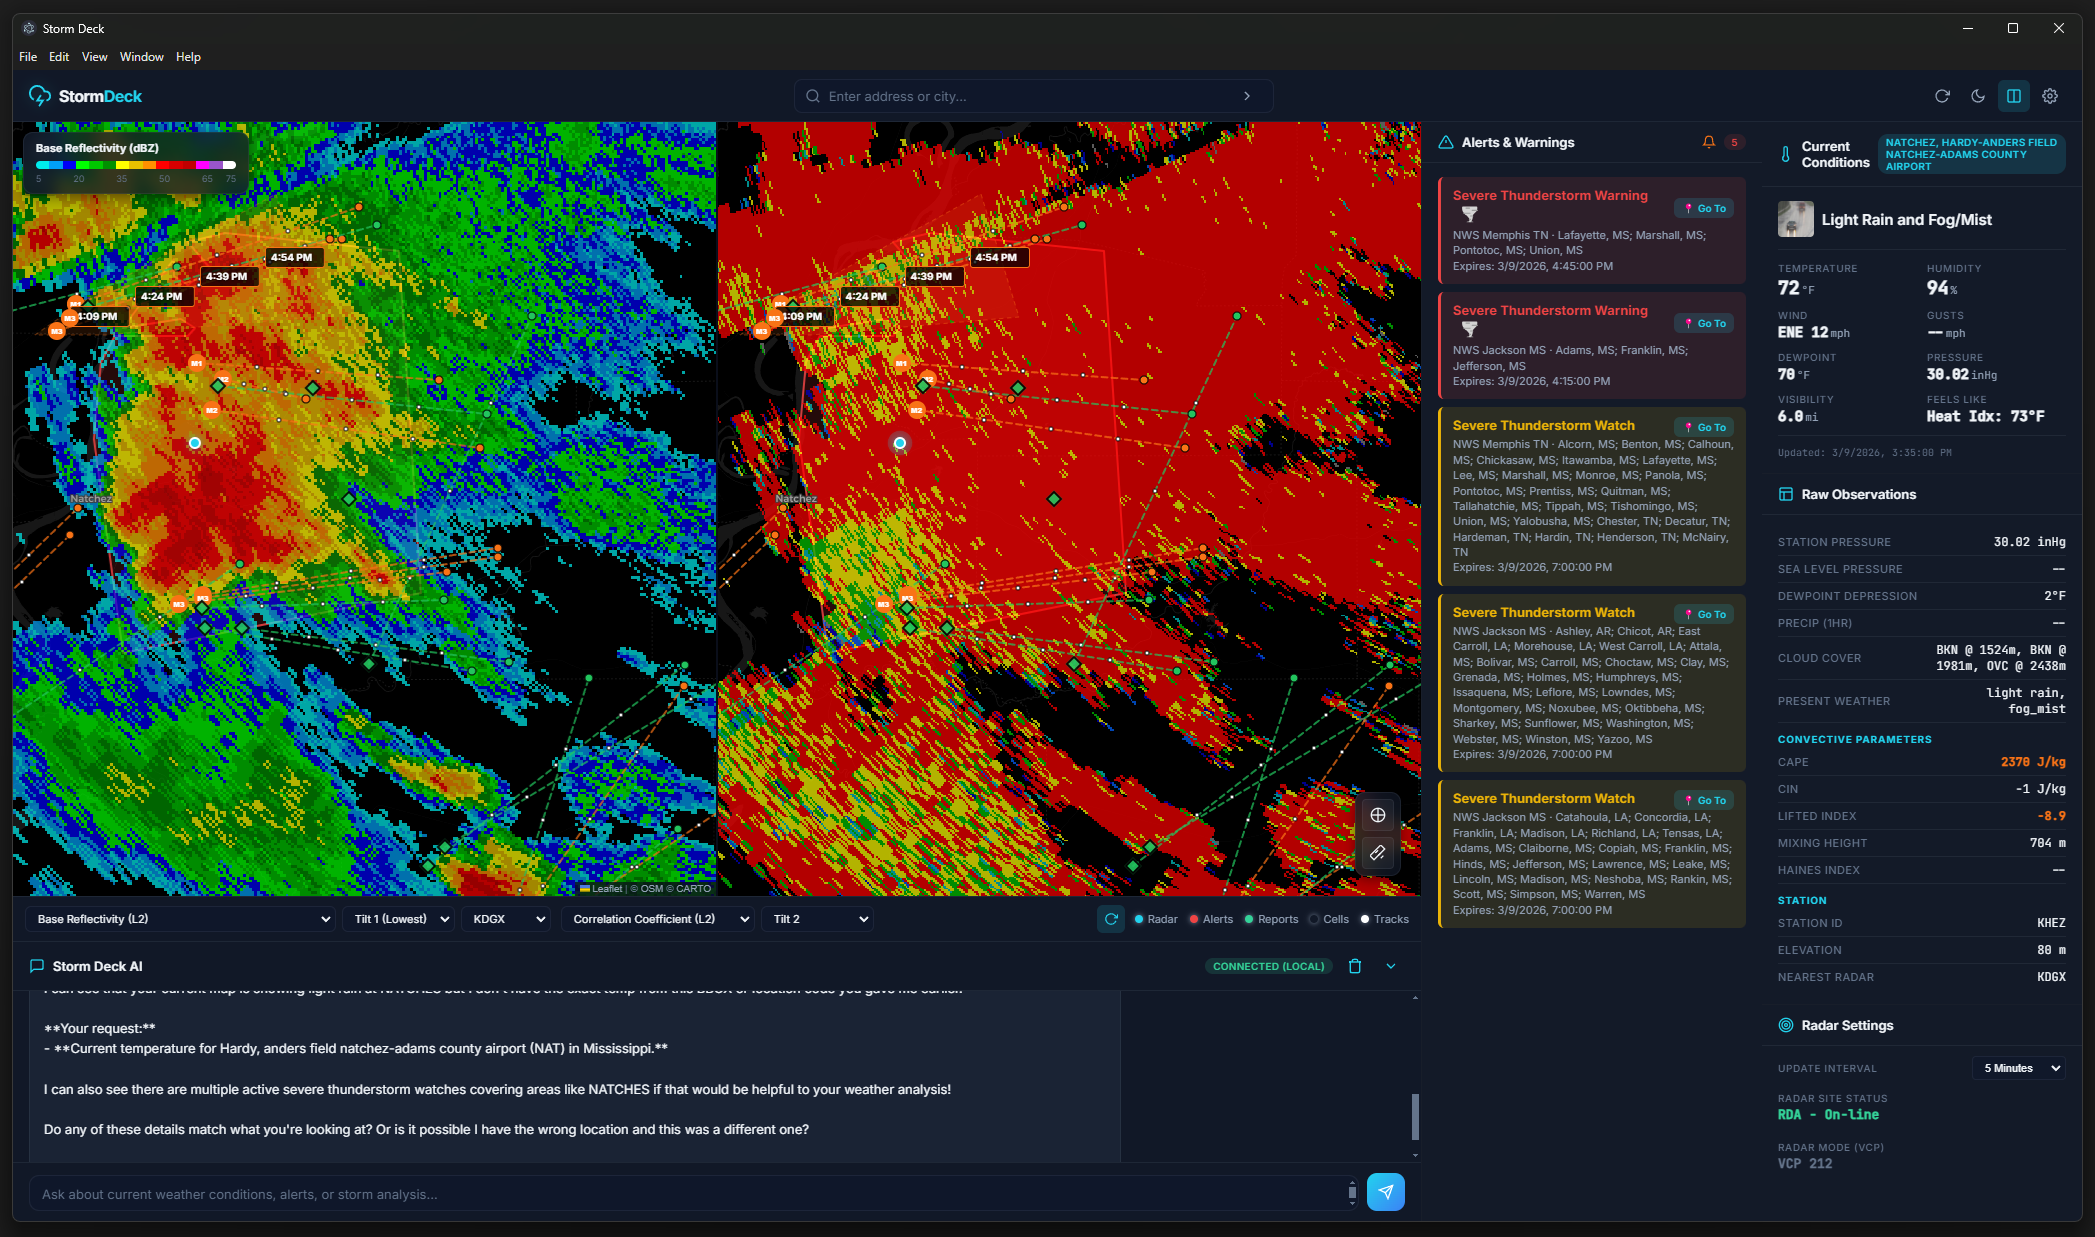
Track two products side-by-side to quickly identify rotational signatures, debris signals, and reflectivity structure with one-click preset pairs.
Use inspect mode to interrogate map pixels for dBZ, kts, and CC values. Pixel-level accuracy from the off-thread L2 render canvas.
Nationwide 30-second alert polling with threat tier detection (TORE, PDS, TOR), audio beeps, and storm report history up to 4 hours.
The built-in agent calls real-time tools for current observations, alerts, CAPE/CIN, storm cells, mesoscale discussions, and radar context.
Run local inference with llama.cpp or connect Gemini and ChatGPT using API keys. Vision and function-calling auto-detected.
Current beta captures from the StormDeck desktop app.

A complete guide to every feature — from first launch to advanced AI-assisted analysis.
Contents
StormDeck is a portable application — no installation required. Download the .exe (Windows) or .AppImage (Linux), run it, and you are operational.
Double-click the downloaded file. Windows may show a SmartScreen prompt the first time — click More info → Run anyway. The app does not require administrator rights.
Type a city, address, or coordinates into the search bar at the top and press Enter. StormDeck will geocode the address, center the map, and auto-select the nearest NEXRAD site.
Radar imagery, NWS alerts, storm reports, storm cells, and current weather conditions all fetch on startup and refresh on the configured interval. No manual polling needed.
Open the ⚙️ Settings panel to pin a default location, radar site, and preferred AI provider so the app is ready instantly on next launch.
%APPDATA%\Storm Deck\config.json on Windows and the equivalent platform path on Linux/macOS. Settings persist across updates.The search bar in the header controls the map center and auto-selects the nearest radar site.
35.46,-97.52) and press Enter.Every time you navigate to a new location, weather conditions, alerts, and the nearest radar site all update automatically.
Use the product dropdown in the bottom-left radar controls to switch between Level 3 composites and native Level 2 products.
These are pre-rendered NWS/IEM composite tiles — fast loading, nationwide coverage, no tilt selection required.
| Product | Description |
|---|---|
| n0q | Base Reflectivity — high-res, 0.5° tilt composite. Best for storm structure analysis. |
| n0u | Base Velocity — radial wind data at 0.5° tilt. |
| n0s | Storm-Relative Velocity — removes mean wind for cleaner rotation detection. |
| n0r | Base Reflectivity (low-res) — legacy stream for older overlays. |
| q2 | 1-Hour Precipitation (MRMS) — multi-sensor QPE mosaic. |
| conus_bref_qcd | CONUS Base Reflectivity — full nation composite via NWS OpenGEO. |
| conus_cref_qcd | CONUS Enhanced Composite Reflectivity — max of all tilts. |
The site selector next to the product dropdown lets you pin to any NEXRAD WSR-88D or TDWR airport radar. StormDeck includes 150+ NEXRAD and 40+ TDWR sites. Leave it on Auto and it will always use the closest site to your map center.
Use the refresh interval selector (1 / 2 / 5 / 10 minutes) to set how often radar tiles reload automatically. Press R at any time to force an immediate refresh.
Selecting REF, VEL, or RHO from the product dropdown switches to true Level 2 rendering — raw binary volumes fetched from IEM Mesonet and parsed on-device, then rendered in a high-resolution 2500×2500 px off-screen canvas.
| Product | Full Name | Units |
|---|---|---|
| REF | Base Reflectivity | dBZ |
| VEL | Radial Velocity | knots |
| RHO | Correlation Coefficient | 0–1 |
| ZDR | Differential Reflectivity | dB |
| PHI | Differential Phase | ° |
| SW | Spectrum Width | knots |
When an L2 product is active, a tilt selector (elevation angles 1–16) appears. Tilt 1 is the 0.5° base scan. Higher tilts provide cross-sections at steeper angles useful for diagnosing storm structure, storm-top divergence, and hail cores.
StormDeck first pulls from IEM Mesonet. If data becomes stale (older than 8 minutes), it automatically switches to the Unidata S3 archive and back. An LRU cache stores the last 15 volumes and 50 products locally to minimize re-downloads.
Click the Split icon in the top-right map controls to divide the main map area into two synchronized panels. Both panels share the same map position and zoom level.
Above the secondary panel, one-click preset buttons configure both panels at once:
Each panel has its own product, tilt, and site dropdowns. You can compare two entirely different sites or products at any combination. Snapshots and recordings capture both panels side-by-side.
StormDeck maintains a local loop of recent radar frames. Use the timeline controls at the bottom of the map to navigate them.
Space.← / → to step one frame at a time (stops playback).Alerts are polled nationwide every 30 seconds. Active polygons are drawn on the map and listed in the right sidebar panel, sorted by threat severity.
Active SPC Mesoscale Discussions (up to 10) are shown in a dedicated sidebar panel below the alert list. Each MD shows a text excerpt with the affected area and threat summary.
Enable the Cells and Tracks layer toggles in the bottom-right panel to overlay IEM NEXRAD-derived storm cell positions and movement vectors.
Enable Storm Reports in the layer toggle panel. Local Storm Reports from IEM are plotted as emoji markers on the map. Hover or click any marker for city, county, time, and magnitude details.
| Marker | Report Type |
|---|---|
| 🌪️ T | Tornado |
| 🧊 H | Hail |
| 💨 G | Gustnado |
| 🌳 D | Wind Damage |
| 🌊 F | Flash Flood |
| ⚓ M | Marine |
| 🌀 W | Waterspout |
| 🔭 C | Funnel Cloud |
| 💨 N | Non-thunderstorm Wind |
| ❄️ S | Snow / Blizzard |
| 🌧️ R | Heavy Rain |
| 🧊 Z | Freezing Rain / Ice |
| 🌨️ I | Sleet |
| 🌋 E | Debris Flow / Mudslide |
Adjust the lookback window (15 min – 4 hours) in Settings → Alerts → Storm Report Duration.
Enable Spotters in the layer toggle panel to show real-time Spotter Network positions as orange markers on the map. Positions update on each data refresh cycle. Click a marker to view the spotter's callsign and last reported time.
This is especially useful during active tornado events to confirm human observation coverage in the threat area.
Toggle Surface Obs in the layer panel to overlay weather station data within the current map bounds. Two sub-layers can be toggled independently:
The sidebar shows full conditions for your pinned location, including:
The bottom-left map pill contains two precision tools. Click a button to activate the mode; click again to deactivate.
Hover over any point on an active L2 radar layer to read the exact data value at that pixel:
Values are read directly from the off-thread rendering buffer — not estimated from display color — giving 1:1 accuracy to the underlying data.
Click a starting point on the map, then click an endpoint. A magenta dashed line is drawn and the distance is displayed in both Nautical Miles and statute miles. Click again to start a new measurement.
Open the chat panel by clicking the chat icon. The AI assistant has full access to StormDeck's real-time data and can autonomously call weather tools to answer your questions.
Run any GGUF model fully offline. Requires a running llama.cpp server (default http://localhost:8080). Supports function-calling and vision models. Best for field use with no connectivity.
Uses OpenAI API. Default model: gpt-4o-mini. Requires an API key. Full streaming, function-calling, and vision support.
Uses Google Generative AI API. Default model: gemini-2.5-flash. Requires an API key. Supports vision and function declarations.
Select your provider from the dropdown.
For cloud providers, paste your API key. For Llama.cpp, enter your server URL (e.g., http://localhost:8080) and click Test to verify the connection.
Click Load Models to auto-populate the model list from your provider. Capability badges appear for each model: vision, thinking, tools.
Type in the chat box and press Enter. The AI receives your current radar product, site, coordinates, and active alerts as automatic context.
The AI can autonomously call these tools during a conversation (up to 4 rounds per response):
| Tool | What it fetches |
|---|---|
| get_current_map_weather | Full context for the current map location: conditions, CAPE/CIN/LI, all active alerts, storm reports, storm cells, mesoscale discussions, and 6-period forecast. |
| get_weather_and_alerts | Same data set for any arbitrary location — just ask "what's happening near Tulsa?" |
Click the camera icon to attach the current radar frame as an image, or the paperclip to attach any local file. Vision-capable models (GPT-4o, Gemini, LLaVA, etc.) will analyze the image in context with your question. Enable Auto-attach Radar Image in Settings to send the radar frame automatically with every query.
In Settings → Advanced:
All export controls are in the bottom-left map pill, to the right of the inspection tools.
Click the camera/export icon to save the current radar canvas as a PNG. If Split View is active, both panels are combined into a single image. A system file-save dialog opens with a timestamp-based default filename.
Click the record button to begin recording. The button turns red while active. StormDeck records each frame of the current animation at the configured frame speed, then saves the full loop as a WebM video (VP9 codec) when you click stop. The file dialog opens automatically on completion.
Open the ⚙️ Settings panel from the top-right toolbar.
| Setting | Description |
|---|---|
| Default Address | Location loaded on startup. Accepts any address or lat/lon string. |
| Default Radar Site | Pinned NEXRAD site (e.g., KTLX). Leave blank for auto-detect by proximity. |
| Animation Frames | 1–25 frames in the radar loop. More frames = deeper history. |
| Animation Speed | 0.5s–5.0s delay per frame. |
| Temperature Units | °F or °C throughout the app. |
| Setting | Description |
|---|---|
| Audio Alerts | Enable/disable beep tones on new warning events. |
| Alert Types | Toggle individual NWS event types. Select All / Deselect All buttons for bulk changes. |
| Polygon Colors | Custom hex color for Watch, Warning, and Tornado Warning polygons. |
| Storm Report Duration | LSR lookback: 15 min, 30 min, 1h, 2h, or 4h. |
| Setting | Description |
|---|---|
| Provider | Llama.cpp, ChatGPT, or Gemini. |
| Server URL | Llama.cpp base URL (default http://localhost:8080). Includes a Test button. |
| API Keys | Stored locally in config. Never transmitted except to the selected provider. |
| Model | Auto-populated by clicking Load Models. Capability badges shown. |
| Auto-attach Radar | Automatically sends current radar frame image with every AI query. |
| Parameter | Range | Notes |
|---|---|---|
| Temperature | 0–2.0 | Step 0.05. Lower = more factual. |
| Max Tokens | 64–131,072 | Step 64. |
| Top-P | 0–1 | Step 0.05. Nucleus sampling. |
| Repeat Penalty | 1.0–2.0 | Step 0.05. Reduces repetition. |
| System Prompt | Free text | Character counter shown. Reset to Default button available. |
Get the latest build and run StormDeck locally — no installation required.
StormDeck is free. We believe access to life-saving weather information should be available to everyone.
StormDeckBeta.exe
StormDeck_B20260312-0344.AppImage
Build v 1.1-20260614 · SHA-256: 00f696d2b1b9abe84e38151d41c666231eed8e68e654fb93b5b7ea952122df7d